Sunday, April 26, 2009.
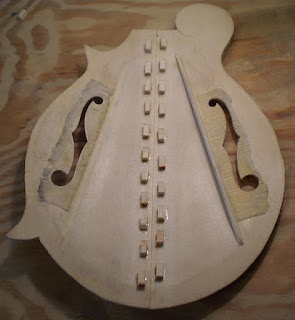
Yesterday I got a few honey-do list projects done and then got to spend a little time prepping and gluing the new soundboard together. I chose not to include pictures of that since they would be of little difference than the ones I posted for the first. That was about all I got done on Saturday.
Today, while the soundboard glue continues to cure, I took to the task of gluing my peghead veneer onto the peghead. Since, once the instrument is completed, the veneer will be butted directly against the nut and, since the nut is perpendicular to the fretboard rather than the peghead, the first step in this process is to prep one edge of the veneer to the angle of the nut.
I had done this a couple of weeks ago using a drawing from Mr. Siminoff’s book, so all I had to do today was to verify the angle still looked good to me. Holding against the peghead as if glued on, the angle of the edge appears to be perpendicular to the fretboard as it should be. Looks good.
On to the next step - sanding the peghead smooth to make it ready for gluing.
As you may recall, the last thing that I did on the neck and peghead was to install the circular scroll reinforcement. When I put the neck aside, I had not sanded down the reinforcement. So that is what I did. Since the reinforcement still protruded quite a bit, I started by using my hand-plane to remove the majority of the protrusion. Once it was close to level, I switched over to sanding with 320 grit paper on my orbital palm sander. This process only took a few minutes and now, with a silky smooth surface on which to glue, I was ready to get back to work on the veneer.
I started by match-marking the centerline on the nut and point edges of the veneer to match those on the peghead. Now that I had my reference points, I was ready to mark the outline of the peghead onto the veneer using my pattern and a mechanical pencil.
That completed, I retraced the same pattern onto the peghead itself.
With matching patterns on the peghead and the veneer, I was able to lay the veneer on the peghead, verify they lined up, and then clamp them in place so I could drill for alignment pins.
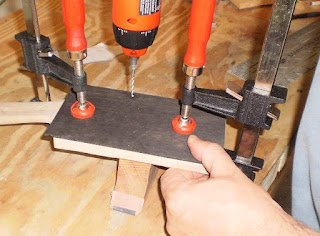
The alignment pins are nothing more than finishing nails with their heads cut off that are located in the “junk” area of the peghead blank. By putting them in during the gluing process, I am assured that the veneer will align exactly where I want it, without slipping, while clamping and the glue setting. I cut off the heads of the nails so that the gluing caul (a 3/4” piece of plywood) would push them flush with the veneer without interfering with the clamping itself.
After cutting out a hole to roughly match the truss rod pocket, I was ready to glue.
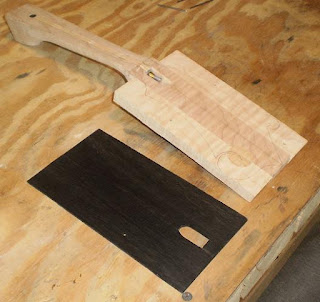
Once again using hide-glue, I liberally applied the glue and clamped up.
After taking these shots, I also added one more clamp right over the truss rod pocket.
MISTAKE (I stopped counting) - Just after I had applied my glue and started clamping, I realized I had not cut a hole in my gluing caul over the truss rod pocket. This hole would have allowed me to clear out any glue that oozed into the truss rod pocket. Now, I will have to wait until the assembly is dry and chip/sand/scrape the glue out. Not too bad (I hope), but still a pain nonetheless.
Sunday, April 26, 2009
Friday, April 24, 2009
Soundboard Repair Complete
Friday, April 24, 2009.
Well, today I got home from work excited to check out my repair joint and pat myself on the back for a job well done. I had, after all, found a way to repair the glue-joint on a "finished" arch-top mandolin. So, after dinner, I took to the task of removing my spring clips and removing my repair blocks.
Looking pretty good. Dried glue beaded up on both the top and bottom of the joint - no problem.
An after only about 3 minutes of block removal - pretty easy.
Then I started scraping and sanding.
And reality hit home.
This was not only the dried glue beaded up on the joint, but the joint itself standing out like a sore thumb. And gaps - not huge ones, not ones that go all the way through - lots of little gaps.
Clearly I can’t use this on a real mandolin - not with a big-ole line down the middle. So I guess it now becomes a wall hanging or expensive kindling. I can’t even use it in the how-a-mandolin-is-built display I want to build someday.
Oh well. I got my new top and side wood earlier this week so I plan to start remaking those parts again this weekend.
So what lessons have I learned from all this, you might ask?
First - when you think you are ready to glue two pieces of wood together, check again that they going where they should and, then, check again.
Second - once you have glued your tone bar in the "wrong" location - leave it.
Third - when you remove that wrongly located tone bar, don't try to salvage it. Carve it out. Destroy it.
Fourth - when you do decide to soak that tone bar free, order new parts. You'll need them.
And, of course (as we all already know), don’t eat the yellow snow.
Later.
Labels:
hide glue,
hide-glue,
mandolin repair,
soundboard
Thursday, April 23, 2009
Gluing the Soundboard - Again
Thursday, April 23, 2009.
As I had hoped I got all the repair blocks glued on last night.
And this evening when I got home from work, I started by preparing the mating edges of the soundboard halve for gluing. For this prep I decided that I needed to sand the edges smooth. To do that, I needed to sand the entire edge at the same time and that required as flat of a surface for the sandpaper as I could find. Not having anything better, I took the pane of glass that I originally purchase for use when sharpening my planer blades. I took off the sandpaper pieces that were already taped on and then taped on a full sheet of 350 grit sand paper. I then took the first of the two soundboard halves and, holding it by the repair blocks, began to sand it gently length-wise.
After sanding for a few moments, this was the pattern left on the sandpaper showing where the contact was.
Clearly, my joint was not as flat as I needed. Once I was happy with it, I moved to the base side. Here is its contact pattern.
Even worse!
Once I had sanded both halves to where I was satisfied that they were as square as they would get, I switch over to 600 grit paper to finish. Holding the two halves together up to a light showed no gap. Woohoo!
The next step, of coarse, was to dry clamp the two halves together as practice and to verify that everything would work out once glue is applied. Good thing I did. As it turns out the spring clips are way too strong for this application as they come out of the box. As it happens, two of the repair blocks broke of under the pressure. So, to correct this problem, I chose to “spring” the clips to weaken them. That was a simple process that I was able to do by hand.
Once sprung, the clamps offered a small but sufficient force and I was ready to glue.
I am pretty pleased with the way this all seems to be working out but it is difficult to be sure since the glue squeezed out both the top and bottom of the crack. Tomorrow will tell the tale.
Labels:
hide glue,
hide-glue,
mandolin building,
soundboard
Tuesday, April 21, 2009
Getting Ready to Repair the Soundboard
Tuesday, April 21, 2009.
So I have started with my repair of the soundboard. To begin with, I thought I would make sure to document what it looked like before the repair:
You can just see the faint crack going most of the way up the center. I would have included a picture of the outside, but there was really nothing to see in that photo - the crack was almost impossible to see with the naked eye and did not show up at all on the picture.
And here are pictures right after I managed to get it in half. To do this, I had to purchase a heat gun rather than using a hair dryer as I had planned (my wife's hair dryer puts out almost no heat at all!).
One note of caution for anyone like me who has never used one before - I purchased one of those heat guns that are sold in the wallpaper section of Lowe's - those things put out some serious heat. I actually scorched the wood a tiny bit without even trying.
Here are the repair blocks I made to glue on the inside and outside of each half. I made about 40 of them. You will notice I made a small mark on some of them - this was a visual reference I used to let me quickly find the side I sanded in preparation for gluing.
Me sanding one of the blocks. I am using 600 grit paper for this. I am hoping that is fine enough for this repair step. I also sanded the mating areas on the soundboard with 600 grit paper and wiped both down with a clean, dry rag before gluing.
And, finally, here I have clamped the repair blocks to the top of each side using hide glue and clothespins. I am only gluing the blocks on the top tonight because I was worried that if I tried to clamp on the bottom as well, something was going to get knocked out of position. I would rather take two nights to do this than mess it up by being in a hurry.
Now we wait till tomorrow night.
Labels:
building,
hide glue,
hide-glue,
mandolin,
mandolin building,
mandolin repair
Monday, April 20, 2009
Monday, April 20, 2009.
Well, while am still going to build a new soundboard as I have said, first I am going to see what I can do to repair the old, cracked one. The folks at the Mandolin Cafe have been quite helpful with ideas and encouragement and one of the guys came up with an idea that sounds pretty promising. Here's the plan.
I am going to start by using a heat gun (hair dryer, actually) to separate the two halves of the soundboard. This should be pretty simple, I am told, because the hide glue should give up under direct, high heat. Then, once it has cooled off, I will carefully dress the edges so they are as flat and straight as I can get them in preparation for re-gluing.
Now here's where the cool idea comes in.
I will then take some short, 1/4" wide pieces of spruce (same wood as the soundboard) and glue them with hide glue back about 1/4" or so from the edge, both top and bottom. I anticipate I will use about 40 strips - 10 top left, 10 top right, 10 & 10 on the bottom. Then, when I am ready to glue my halves together, I will take large black spring clips - you know, those jobs used in offices for paper clips - and clamp them together. I figure these should give plenty of force and, once I have the first three or four clipped on, I can make any needed alignment adjustments with relative ease. The rest can then be clipped on quickly.
Once everything has dried for 24 hours or so, I will take my carving tools and carefully carve away my clamping blocks. A bit of scraping, a bit more of sanding, and if everything goes as planned, all traces of the blocks will be gone. A bit more scraping and sanding to get rid of any small alignment errors (although I have trouble even imagining that they might exist) and, Wa-La, a good-as-new soundboard.
I'll let you know.
Saturday, April 18, 2009
Definitely Replacing the Soundboard
Saturday, April 18, 2009.
This morning I got up, took a look at my soundboard, and sadly I now find that a crack has developed in the glue joint between the two halves of the soundboard. Here are some pictures.
I guess this cements the decision I already made to remake my soundboard. I imagine I will attempt to fix this, but I am going to see what the experts say at the Cafe first.
My wife and I had another yard sale today so I wasn’t able to work on the mando through the day, but once we were done with that I was able to spend a few quality moments with my now-possibly-defunct soundboard. One of the luthiers at the Cafe suggested that, assuming I am able to salvage the soundboard, I should remove the sides completely and re-glue. So, as a first attempt, I gave a relatively gentle tug between the two and - pop -they came further apart. Another gentle tug and - pop-pop - almost completely apart with only the head-block remaining attached to the soundboard. Add a bit of water, pull again, and - pop - completely free. Now, either my initial glue job was a lot worse than I thought, or my water soaking method had a much greater effect than I previously thought. As I think about it, I am guessing probably both.
In any case, there are three distinct lessons I have learned from this; one - take extra care to make sure that you are gluing pieces where they actually belong (the first time), two - if you can’t make yourself follow lesson one, DO NOT SOAK THE SOUNDBOARD in an attempt to salvage pieces that simply be replaced (and they can all be pretty well replaced), and three - take extra care to make your joints correct BEFORE gluing - otherwise you get to do it over.
Finally, after removing the sides, I thought I would hold the soundboard up to a bare light bulb to see just how good of a job I did carving the thing. Below is a picture of what I saw.
As you can see, I did not do a very good job (yet another reason I am becoming happier and happier to remake the thing). From what I have read, there ought be a nice, distinct light ring about an inch or so in from the edge where the wood is thinner than everywhere else. This ring should be of roughly uniform width and go pretty much all the way around. The rest of the surface ought to be pretty uniform getting thicker in the center. On mine, it is clearly quite a bit thicker at the base and inconsistent everywhere else. Obviously checking this against a light is not a step I took before. I certainly will on the next one, though.
Friday, April 17, 2009
Some Backwards Steps
Friday, April 17, 2009.
Earlier this week, I posted some pictures of my work out on the Mandolin Café website and luckily (or unluckily I suppose depending on how you look at it) one of the REAL luthiers who frequents the site pointed out that one of my tone bars was glued in the wrong location. Sure enough, when I went back and checked it against the plans, I had indeed missed the mark. A little embarrassing to not catch something so big myself, but I guess that’s what learning is all about.
So yesterday, I decided to try to “unglue” the bar by soaking it with water hoping to soften the glue enough to get it off. After letting it soak overnight, not only was I NOT able to get the bar off, but I DID manage to unglue the soundboard from the side wood. Oh yeah, I also managed to warp the soundboard. And I suspect I might have ruined the glue joint between the kerf lining and the side wood, too. Way to go, Steve!
Of coarse one of the other REAL luthiers suggested that I simply carve away the mis-located bar and replace it with a new one. I thought about doing it this way (and probably should have taken his advice) but not having extra wood from which to make a new bar, I opted to try my removal process instead. Sigh.
So, all this damage done, I have decided to start over on the soundboard-side wood bending-kerf lining. I can’t say that this is a really bad thing, though, since I must confess that I was a little disappointed in the overall results I had achieved on this first assembly – my side wood bending was a little “off” from the shape of the mold, my mahogany blocks were not quite the right shape to match the thickness of the side wood, and I think I can do a much better job of shaping and finishing the soundboard before installing the tone bars. In all, I think I will probably be a lot happier with my finished instrument this way. So, I placed another order today with my friends at Steward-MacDonald for new top and side wood and, once that arrives, I can begin again.
This evening, I got home from work and took another last look at the tone bar, having decided to go ahead and continue to let it soak all day - after all what more damage could I do? When I took the soak rag off, much to my surprise, the tone bar popped right off. No additional damage to the soundboard.
I’m still gonna go ahead and build the second soundboard though. After considering my ongoing disappointment with the first one, I think I will be a lot happier if I do.
In the mean time, I still have plenty to do with finishing the back and getting the neck ready to attach. Here is how the scroll on the back is coming.
In the long run, my hope is to “salvage” the old soundboard-side assembly enough to use for a “mandolin-build-in-process” display some day. I have often thought that this kind of display would be kind of cool to have set up at a festival or such. Maybe this can be my first piece for such a display.
Sunday, April 12, 2009
Carving the Back
Sunday, April 12, 2009.
What little time I had this week was completely focused on carving the outside of the back. As with the soundboard, I did all of this by hand using my carving tools and scraper. Unlike the soundboard though, for the back I went ahead and clamped the part to the bench while I carved. Clamping certainly makes it a lot easier to remove material than working free-hand does especially when carving on hard wood.
Like the soundboard, I used templates from the book as a guide. This shows my templates laid out in the positions where they were used.
As you can see in the three shots above, I decided to start by clamping one edge to the bench and then remove much of the excess wood from the unclamped side. I figured this would save me time later in the process. As it turns out this really did not help me much and, on my next project, I will not do it again. Rather, I will carve out the shape of each of the patterns, as I did with the soundboard, and then carve the rest to match. This is the technique I ended up using for the most part anyway. Here are more photos after I got most of the body work done.
And then I worked on the top and some on the scroll. Photos below.
As should be clear from this last picture, I have only started roughing the scroll. I imagine I will probably make it somewhat shorter (lower profile) than it is now and, depending on how I end up liking the scroll extension to the back, I may do away with it, too.
What little time I had this week was completely focused on carving the outside of the back. As with the soundboard, I did all of this by hand using my carving tools and scraper. Unlike the soundboard though, for the back I went ahead and clamped the part to the bench while I carved. Clamping certainly makes it a lot easier to remove material than working free-hand does especially when carving on hard wood.
Like the soundboard, I used templates from the book as a guide. This shows my templates laid out in the positions where they were used.
As you can see in the three shots above, I decided to start by clamping one edge to the bench and then remove much of the excess wood from the unclamped side. I figured this would save me time later in the process. As it turns out this really did not help me much and, on my next project, I will not do it again. Rather, I will carve out the shape of each of the patterns, as I did with the soundboard, and then carve the rest to match. This is the technique I ended up using for the most part anyway. Here are more photos after I got most of the body work done.
And then I worked on the top and some on the scroll. Photos below.
As should be clear from this last picture, I have only started roughing the scroll. I imagine I will probably make it somewhat shorter (lower profile) than it is now and, depending on how I end up liking the scroll extension to the back, I may do away with it, too.
Sunday, April 5, 2009
Cutting F-Holes, Tone Bars, and Gluing on Soundboard
Sunday, April 5, 2009.
While it was a short week and I wasn’t able to spend as much time on my project as I would have liked, I still accomplished some of the more impressive steps to date and am very pleased with where I am.
Having been out of town on Saturday, Sunday and Monday of last week, I got back to work on Tuesday evening by first removing all my clamps from where I left them last Friday and then cutting out the F-holes in the soundboard.
The photos above show the results of my gluing on Friday.
As I started to cut the F-holes I was a little nervous about this step since the soundboard is so thin (as little as .01”) and I was planning to use a powered scroll saw to do the work. My fear, naturally, was that the scroll saw would cause cracks or some kind of chipping. My other option was to try to cut these manually using a hand-held scroll saw with one hand while trying to steady the soundboard with the other. While the manual method would likely help prevent chipping and cracking, I opted for better material handling control and went with the powered method. I figured the gauze I glued in earlier was my insurance against damage. As Mr. Siminoff suggested, I made sure to cut slowly.
I started by drilling four holes, one in the center of each scroll “balls” (best description I can think of on short notice) using a small 1/6” bit as a pilot followed with a larger 1/4” bit which is big enough to allow the scroll saw blade to be inserted. Then with these four holes drilled, I moved over to the scroll saw and began cutting.
In this picture, you can see where I have made my first cut from one hole to the other and am getting ready to cut around the ball.
As I did this next step, I learned something - cut out the ball first and then cut the long stretches. Here is why; as I made the cut around the ball, the “stretch” cut (my term) completed earlier, I found that the wood was vibrating badly and realized that the inside point where the stretch cut meets the ball was having to handle all that vibration with no support. Had I cut the ball first and then the stretch, starting the stretch cut at the point, the stress from the vibration would have been shared by a lot more wood rather than just the point. I hope that makes sense.
In any case, the points on this first F-hole made it through my abuse and I went successfully on with the second one much happier with my new-found insight. Here are some photos of the finished results after some sanding.
That pretty much did it for Tuesday night.
Wednesday I started with the tone bars. Back when I started this project, I made it a point to save pretty much all my scrap wood so, when it came time to make these, I was able to cut them out of the scrap pieces I saved from the blanks used to make the soundboard itself. Once I had cut out my tone bar blanks as per the dimensions in the book, I needed a way to transfer the shape of the inside curve of the soundboard to the bars so I could cut them to fit. To do this I went about as simple as it gets. I took a small piece of scrap side wood and taped on some lead from my mechanical pencil. Holding this in my right hand while holding the tone bar blanks in position with my left, I gently traced the curvature onto the blanks.
The razor blade (that’s saw dust on it) is there for reference.
Once I had the blanks marked I cut them roughly to shape.
Then I went through the time-consuming process of sanding and shaving them to actually match.
Then it was time to glue them in place. For this, I used three clamps one each tone bar with leather cauls on the back side of each clamp and a board on the from to help distribute the pleasure more evenly. As with most gluing procedures, I finished of the night with this step and left them to dry for 24 hours.
These photos only show the first of the two bars being glued. I glued the second one on right after taking the pictures.
Thursday I removed the clamps and did an initial crowing and cleaned the edges of the joints between the bars and the soundboard.
That is a pencil mark on the front edge I used as a reference while fitting the tone bar, not a crack. It actually fooled me once while I was working on it, too.
Come Friday, it was time to glue the soundboard to the sides. This process was one I had been looking forward to with both excitement and a little bit of trepidation. I figure this is where it starts coming together or you find out you have to take some big backward steps. While I frequently compared my soundboard to the side assembly at each stage of the process, I couldn’t help but worry. Fortunately, nothing seemed too out of whack to prevent me from gluing up, so I went for it.
For this, I used my 40 cello clamps, the side mold for reference, and hide glue. After preparing the clamps and getting the hide glue to temperature, I spread the glue and worked as fast as I could to clamp the soundboard in place. Here’s how it looked with all the clamps in place.
I was concerned with the time that it took to get all the clamps on since I have read that the hide glue dries quickly, but I figured that even though it took longer to complete than I wanted, I would wait and see how it looked once dried and, if necessary, take it apart and try again if it didn’t hold. With that, I was done for Friday.
Saturday was completely a wash as far as mandolin building goes since my wife and I decided to go to an auction that ended up lasting all day. We got some good stuff, but boy, what a day. Once we got home and got unloaded, it was about 9:00 pm, so about all I had time for was to unclamp and inspect my glue joints. It appears that contrary to my worries, my clamping speed was sufficient and the joints are tight. Here is how it came out.
I’m going to have even less time available next week so I am not sure if I will get enough done to really be worth posting, but I probably will anyway. Until then.
Subscribe to:
Posts (Atom)