Saturday, February 21, 2009

Body Mold, Again

Saturday, February 21, 2009.

I had to go into work this morning so I didn’t get to work as much on my project as would have liked, but then on the other hand, I discovered once I did get started that I don’t have quite enough materials to go a lot further right now anyway. Now that is not to say there is nothing to do, mind you, but for the time being I am going to have to focus on building more gigs and fixtures rather than moving ahead onto the more fun stuff.

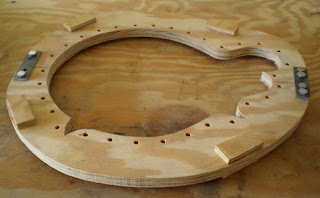
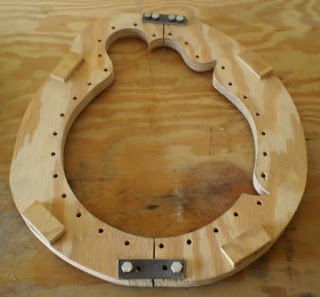
So today, I went back to my body mold and finished up on it. When we last looked at it, I had gotten the interior of it sanded to shape, but last night I trimmed the outside to some contours that will be more contusive to clamping, drilled some holes to accommodate my cello clamps, and glued on some 3/8” thick spacers to hold the mold off of the table. Today, I added two metal connecting bars to the top and the bottom to hold the two halves together. These I cut out of some scrap 3/16” thick steel I had downstairs, drilled holes through both them and the mold, and then bolted them together with some 1/4-20NC bolts, nuts and washers. Here is the finished product:


MISTAKE #2 - I should have accounted for the connecting bars before I ever cut out the mold shape in the first place. This would have done three things for me; first, the holes would have been easier to drill, second, I would have had the holes in the mold in exactly the correct locations with respect to the bars and, third, it would have helped me to preserve the shape of the mold when I cut the mold in half. This is last one is because you want to take the kerf of the saw blade (the thickness of the wood lost due to a saw cut) into account when bolting them back together. As it ended up, I had to estimate the kerf, make some concessions on hole diameters when tightening it up and, finally, leave out a couple of bolts because the holes didn't line up.

Thursday, February 19, 2009

Bending Practice

Thursday, February 19, 2009.

Been trying my hand at bending wood for the last couple of nights - with limited success. This is not the easiest thing to do, I have found, and there are a lot of differing opinions and methods out there about how to do it. As per both Mr. Siminoff’s and Mr. Troughton’s advice, I am using a steel pipe heated with a propane torch.


I purchased some practice wood from Stewart-MacDonald and I am really glad I did. Not only did I destroy all of that, I was able to learn quite a bit in the process. One of the things I learned about the practice wood itself is that it arrives much thicker than you need. Mine came in at a shade over 3/16” thick, or about double the thickness I ended up wanting. I figured this out after destroying the first of the two pieces I bought. It wasn’t until I had actually started bending on the second piece that I decided to sand it to a more reasonable thickness. Here are the best results I came up with:

Just three small pieces out of everything I tried.

These are some pictures my wife took while I tried to bend a piece that was both too thick and too wide.

Some of the other things I have learned are:
  1. Making the wood really wet (soaking it) is a BAD thing. Using minimal moisture is better.

  2. Letting the pipe get really hot is a BAD thing. As Mr. Siminoff suggests, the pipe should only be allowed to get hot enough to let a drop of water boil off. Anything hotter is too hot. This, for my rig, means setting the torch to about as low of a flame as I can.

  3. The thicker the wood, the harder it is to bend. Once I got my wood to about 0.1” thick, bending it without breaking was much easier.
I have ordered more practice wood, too. I figure it probably makes sense to bend that to the correct shape, at least once, before committing to the real thing.

Saturday, February 14, 2009

Building the Body Jig

Saturday, February 14, 2009.

Checking on the glue job after letting it dry over night, it feels like a really tight hold. Looks like my glue to water ratio is ok.

I had intended to split the piece of maple I bought for my back today only to discover that my bandsaw is way to small for the job. The block is 6” wide in the direction I need to cut and the bandsaw is only capable of accepting material up to about 3-1/2” tall. Since my wife thinks its probably not the best use of money at this time to buy yet another bandsaw to make just one cut (go figure), I guess I will have to find someone who can cut this for me elsewhere. So, instead, I focused on making a body jig and some cello clamps.

The body jig is used to help shape the sides, once they are bent, and to support them later when gluing the kerf lining and then the top and back wood. I am making it from a piece of 24” x 24” x 23/32 plywood.

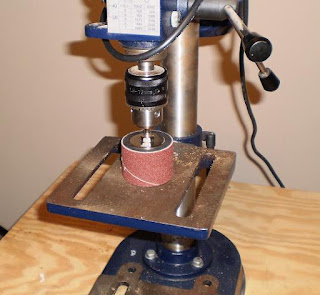
Here you can see where I traced the outline of my plastic template onto the plywood and then cut it out while leaving enough extra for finishing. To finish it, I then used a drum sanding attachment on the drill press and a piece of sandpaper glued with rubber cement to a scrap of thin acrylic for support.

Here is a picture of my drum sanding setup.

Here is a shot of the body jig after I finished sanding it to shape. I spent extra effort on this since, as Mr. Siminoff points out, this jig will ultimately define the finished shape of my mandolin.

Once I finished with this, I started making about 20 cello clamps. These are small spool shaped clamps that will be used to clamp the top and bottom wood onto the sides for gluing. I started with a 1-1/4” x 36” long oak dowel rod that I bought at Lowes. Using the band saw I cut it into 48 disks, each 3/4” thick. Once cut, I took them to the drill press and, using a jig that I made from a scrap piece of maple, I drilled a 1/4” diameter hole in the center (roughly) of each.

My drilling jig. I had to use another piece of scrap wood under the drill press table to account for the ribs on the bottom of the table.

And here are all 48 of the disks with holes in them.

To finish making the cello clamps, I will start by taking each of the disks and gluing a piece of scrap leather onto one face. Then I will cut 24 lengths of #10-24NC all-thread rod into 6” lengths and to each of those, screw on one nut, two washers, two disks, and a wing nut.

I haven’t attached the leather in this picture, but it will be on each face interior face where it contacts the mandolin.

Friday, February 13, 2009

Getting Started

Friday, February 13, 2009

Ok. Got quite a bit done over the last several days including getting sick (and well again), reading through my new book, making some templates, buying and making some additional tools, and getting started on the neck. Even though its more my nature to go straight from one thing to the next, I kept the camera near my workbench and thought to pause occasionally and snap off a few shots. For example (and just for fun) here are a few shots of my workbench and the larger tools I now have.


I got lucky, in terms of money, when I was talking to a buddy of mine who suggested that we could do some horse-swapping with tools. He had both a bench-top drill press and scroll saw that he no longer used while I had a small hobby lathe that I no longer used. This trade let me return my unopened scroll saw to Harbor Freight and get a much needed belt sander. Now I think I am pretty well set with all the large tools I need. Just a few more small ones.

As I said in my last post, the first thing I did before beginning to cut was to read through my new book and that is just what I did. Having finished it now, I find I am even more glad that I purchased and read through the first book before reading this one. Why? Because 1) there are several areas where each author spends a great deal of time focusing on details the other does not and 2) with as tough of a read as I found the first book to be, I probably would not have read through it like I should. Between these two reasons, assuming of course that I follow their directions, I feel confident I will end up with a better mandolin than I would have otherwise.

Aside from being a well written step-by-step how-to book, one of the best things about Roger Siminoff’s book, and one of the main reasons I bought it to begin with, is the fact that he includes a full set of full-sized template drawings in it. From these drawings, you can make what appears to be every necessary template and that is just where I started.

Because I hate the idea of destroying the original drawings that came with the book, I carefully removed them from the book (it is spiral bound with a plastic binding from which it is pretty easy to get pages out and in again) and scanned each into the computer using a printer-scanner-copier we already have at the house and then printed out. One of the things I had to make sure of (and one that Mr. Siminoff points out in the book) is that the software I used to print them delivered 100% sized prints (the first software I tried did not). The software I ended up using is a free one I downloaded from the Web called Serif PhotoPlus 6.0. Because my scanner and printer can only handle up to letter-sized documents, and many of the templates required larger printouts than this, I had to make multiple scans of most pages and then tape them together. This seemed to work out pretty well. Obviously if you don’t have a home scanner, you could take these to a local copy store and simply have copies made.

After I had all my templates made, I cut them out and laid them out on a sheet of 24” x 18” x 1/8” thick acrylic sheet and, once I was happy that with the layout, I glued them on with rubber cement. Here they are before gluing.

After gluing, I used the bandsaw to cut them out.

Next I decided it was time to get into the real thing. As per Mr. Siminoff’s direction, I started by laying out the pattern on the neck block and then cutting it out.


FIRST MISTAKE - Even though the book said to do it, I neglected to verify that my bandsaw and its table were set to give me a true 90 degree cut. Instead, it was just a little bit off which caused my initial cut on the peghead to be slightly under-cut. Fortunately I should be able to adjust for this when squaring up later.

The method that Mr. Siminoff uses to make his peghead is to glue “ears” on each side of the neck. This method does two things for you; first it allows you to use slightly smaller dimensioned blocks for you necks and, second, it lets you orient the grain in the main part of the neck and then reinforce the strength of the peghead by laminating on wood with straight grain. Because I knew I would be doing this, I made sure to save enough of the scrap from my neck block to create these two “ear” blocks from straight grained sections.

In this picture, you can see the profile I cut out and both ear blocks. The rectangle on the right is a sanding block I made by gluing a piece of medium grit sandpaper to a thin piece of acrylic. It is laying on a piece of paper to differentiate it from the workbench.

With the rough neck shape and both ear blocks now cut, it was time to start shaping the neck itself. For this I used a combination of a wood rasp, sand paper, and the Dremel tool and five neck gauge templates to check my progress as I went. I was quite surprised at how easy this step went. I was concerned that the neck shape would be difficult to get, but by using the gauges, I found that I was able to easily see where I needed to cut more and where I had done enough. I am really pleased with the results.


I also used the belt sander to dress my ears and peghead and then glued them together using hide glue.

Working with the hide glue turned out to be really easy, too. The directions say to mix by weight (not volume) 1 part dry glue chips to 1.8 parts water. To do this I got a small jelly jar and my wife’s diet scale. I put in about 10 grams of glue (a single increment on the scale) and then just short of 20 grams of water. By my keen eye :) I am sure it was right at 18 grams. Once mixed, I let it set one full day in the refrigerator and then heated it up the following night to 145 degrees using a pan of water on the stove.

I neglected to take a picture while it was actually heating, so this picture is a dramatic re-enactment and that is why the thermometer shows about 55 degrees.

Once the glue got to temperature, I ran (walked, actually) back upstairs with it and brushed it on and clamped the pieces up. After drying over night, it feels like a really tight hold.
Thursday, February 5, 2009

2nd Book

Thursday, February 5, 2009

It’s finally arrived; my second book - the one I have been waiting for - The Ultimate Bluegrass Mandolin Construction Manual by Roger H. Siminoff (Hal-Leonard Corporation).

As if the mandolin gods are watching, it just so happens that I finished reading The Mandolin Manual last night. Now it’s time to begin reading my new book. As with the first book, it is my intention to completely read through this one, too, before I start marking and cutting. The one thing I will do is to update my lists of materials and equipment. I have also started a list of templates I will be making once I get started cutting stuff.

Wednesday, February 4, 2009

3rd Arrival

Wednesday, February 4, 2009

The remainder of the wood that I ordered arrived yesterday. This includes the curly maple back, sides and neck. At first look, they are beautiful.

Here is the box they came in (and that darned mandolin, again).

And here is the contents. You will notice in this picture that there is tape around the side pieces. This is because it arrived in two pieces, each 2-3/16” x 5/32” thick x 34-1/4” long, taped together just as the two practice pieces did last week. The back came as a single block 2” x 6” x 16-1/2” long that I will have to split in order to create my book-matched set. By all rights, my new 9” bandsaw should be the tool for the job once I figure out how to do it safely.

This picture is an attempt to show the grain and figure of the back. I think it looks great and I think the picture came out pretty well too.

Sunday, February 1, 2009

Shopping, Again

Sunday, February 1, 2009

Much to my (pleasant) surprise this morning, my wife suggested we head out to Harbor Freight to pick up some of the additional tools I need. Since I know she doesn’t really like hardware stores I accepted the offer and, in return, offered to spend some time with her, afterwards, shopping for clothes (which we ended up not doing - by her choice, I might add). Much like Saturday, this turned out to be a good trip and, also like Saturday’s post, here is a list of the major thing I got (no pictures, though):

There is one Dremel 400 XPR, 2 pieces of 2’ x 2’ x 23/32 plywood to be used to make the body mold, a bench-top scroll saw, a bench top band saw, several sizes of hand planes, a soft mallet for use when fretting, and a dial indicator. As promised, I have updated the lists to the right showing everything I have already purchased as well as all those that I know I still need.

Before I cut into anything I am still waiting for my second book and the hardwoods for the back, sides, and neck to arrive, so for now its back the reading and surfing again...

Shopping

Sunday, February 1, 2009

Been busy reading my book, surfing and doing a little bit of shopping over the last couple of days. On Saturday, my wife had to go to Wal-mart for a few groceries and such so I decided to tag along to see what I could find in the more “manly” sections of the store and, since there is also a good sized hobby store nearby, I figured I could probably talk her into letting me go there as well. Turned out to be a pretty good visit to both places and I was able to pick up several of the things from my list and a couple that had not yet made it there. While I don’t think I am going to post pictures of a bunch of tools and supplies sitting idle on the workbench, I will go ahead and list off what I picked up:

There are 2 acrylic sheets, 20” x 16” x 1/32” thick, 48 clothes-pins, 4 craft brushes, 1 roll of blue painters tape, a bottle of super-glue, and a roll of double-stick tape.

I will use the acrylic sheets to create my templates for the top and back, neck, body blocks, and fretboard. The clothes pins are for clamping the kerf lining to the sides when gluing, and the craft brushes are intended for applying the hide glue.

With regard to the book I received on Friday, The Mandolin Manual - The Art, Craft and Science of the Mandolin and Mandola by John Troughton, I must say I find it a difficult read. Mr. Troughton is obviously British and, consequently, his choice of words and units of measure (metric) differ from those used by us common Americans. Because of this I often find myself having to do mental measurement conversions to understand how big or small something is or reading and then re-reading a paragraph just to figure out what he is trying to say. For example, in Chapter 1 where he is describing how to build a body mould, he writes:

“You will also need to buy a length of 19 x 19mm ‘quadrant’ moulding - larger section if available - usually sold in 2.4m lengths. This needs to be sliced up like a loaf of bread into 15mm wide segments with you tenon saw or band saw, so you end up with a lot of ‘little chesses’ as a visitor to my workshop once described them.”

I had to read this a couple of times to realize that he was talking about a cut-up length of 3/4” quarter-round molding. Sure, once I understood it, it made perfect sense, but for a while, I was quite stumped as to what he was trying to describe. But even though this is book is a bit difficult to read, I must say that it is worth the trouble. Mr. Troughton goes into great detail to explain not only what to do but why you need to do it, as well. He explains many of the differences between various woods and how they react to different conditions and, as I mentioned before, he even goes to the trouble of telling you many of the things not to do. While I am still only about half way through the book, I have picked up a lot of good information already and I have no doubt that there will be many occasions when I will look back to this book for information.