This week was less productive than others, but as I get further and further into this, I guess that is to be expected occasionally. What I did get done was to bend all of my side wood, glue most of it together, and to get the maple for the back ready for shaping. Now that I look at it, maybe the week was more productive than I thought.
On Monday, I decided to dress the sides of my maple back wood and glue them together. I clamped each of the two halves into my truing board and squared them with my hand planer. Before I could glue, though, I had to be sure that the two edges were true and square. I did this by holding the two boards together up to the light and looking for a gap between them. The first time I did it, there was enough of a gap that I took one of the boards back to the truing board for rework. The second time, while there was still a really tiny gap, I decided to do a trial clamp-up, and the gap disappeared. Time to glue.
 Here is the back glued and clamped together. Once again, I used hide glue for this and did my best to make the bottom side (opposite the clamps) as flat as possible for the sake for when I plane it later.
Tuesday, I began the process of attempting to bend my side wood. I had a lot of trouble with every bend I tried and would end up breaking the wood. After destroying one full 2-ft length, I gave up for the night and did a little research to try to find out what I was doing wrong. I went back “the source” (www.mandolincafe.com) and found an old post where several professional luthiers shared their techniques. What I found was that there were two things they do differently than I was doing. First, most of them work their unbent wood down to a thickness of 0.70” to 0.8” before bending. This, they explain, makes the bending process, especially when using the hot-pipe bending method as I am, much easier but still allows the finished sides to be strong. Second, most of them use a backing material held against the wood while bending. This backing material is typically a thin strip of metal.
So on Wednesday night, I was ready to try it again, only this time I decided to use my drum-sanding rig to thin my strips down first. This process, it turned out, took quite a while, so after I was done sanding down three strips of wood my night was pretty much used up and I was only able to bend one piece of wood, relatively successfully, before shutting down for the night.
Thursday, I was back at it again, bending and breaking my wood (dang it). The piece I was trying to bend this time was a small section that connects the head block to the first point. This piece, I had read, is thought to be one of the more difficult ones to bend and now I understand why. It is quite a short piece with opposing sharp curves at each end and, as I discovered way back as when I was attempting my first practice bends, bending the wood right at the edges is much more difficult than just about anywhere else along the strip. Consequently, I broke several of these pieces before finally getting one close. At the end of the evening, while attempting to finish bending the second to last piece I needed, I was getting pretty frustrated with my inability to get the sharper bends without cracking the edges. That was when it dawned on me that I needed to try using the backing material the professionals had recommended.
Now before you begin to question my intelligence too much, I had tried this before, but with no success. But that effort and experience was on wood that was too thick, too wide, and too early in my learning curve. Once I realized this was poor experience to base decisions on, it was time to try again.
As soon as I broke out the backing strip it was the difference between night and day. All of a sudden, no more edge cracking and quicker, sharper bends were mine for the asking. It was unreal. The piece I had been laboring over was quickly finished and, where I just knew it was going to crack, smooth. This is one lesson I will not quickly forget.
The last thing I did before closing down for the night was to glue the head block onto the scroll wood.

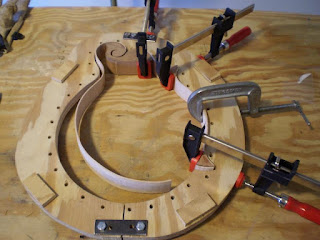
 In these photos, it appears that I might also be gluing the upper point on, too. This is not the case. This is where I had clamped one of the side pieces onto the mold to allow it to dry to shape after bending.
Friday was movie and dinner night with my lovely wife, so no mandolin building.
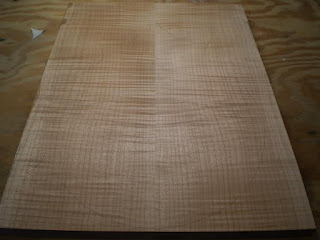
Saturday I bought a surface planer. My back wood was about 1-1/8” thick at its thickest spot and about 7/8” at the thinnest. My goal, as per Mr. Siminoff’s book, is 5/8” (and flat). Not only did my wood vary in thickness, it was also quite cupped and warped. Fortunately my gluing efforts allowed it to be relatively flat on one side so putting it through the planer was no problem.

 Its really hard see much from these pictures, but these are both sides before planing.
 And here I am getting ready to make my first pass. I did nothing extra to attempt to hold the part flat or square.
I am really happy with the results of my planing. The board came out really nice.


 Here it is as it came out of the planer and then as I marked it with my template. (It's really hard to see, but there is a penciled outline there!)
Finally, I made new mahogany point blocks and was able to glue most of the rest of my side pieces together. I chose to make new blocks when I found that the shapes that Mr. Siminoff supplies did not match well with what I needed to match the side wood and the mold. While I am comfortable that this is purely a result of inaccuracy on my part when I made my mold, making blocks that match it are now necessary. To do this, I traced the curves of my mold onto paper, offset the lines by the thickness of the side wood and then used those to make new templates.

 In this picture (above), I clamped the wild end of the scroll piece back to mold simply for the photo. I intend to make a couple of minor bending adjustments to this piece before gluing it to the tail block.


No comments:
Post a Comment